I wanted to create a simple graphics editor that has some UI element live in a canvas. Hence, they can be freely positioned. In former days, I would handle the creation of the elements, their positioning, sizing and so on in code behind. This time however, I want to use the MVVM approach instead.
This is an actual example that I used for creating a report editor.
Model
I’ll start with a simple text item on the level of the model. It can contain a plain text and properties for positioning.
public abstract class ReportItem
{
  public const double DefaultX = 0;
  public const double DefaultY = 0;
  public const double DefaultWidth = 100;
  public const double DefaultHeight = 20;

  protected ReportItem()
  { }

  public double Left { get; set; } = DefaultX;

  public double Top { get; set; } = DefaultY;

  public double Width { get; set; } = DefaultWidth;

  public double Height { get; set; } = DefaultHeight
}

public class TextItem : ReportItem
{
  public TextItem() : base()
  { }

  public string Text { get; set; }

  public string Format { get; set; }

  public override bool Equals(object obj)
  {
    return obj is TextItem other &&
      Equals(Text, other.Text) &&
      Equals(Format, other.Format);
  }

  public override int GetHashCode()
  {
    return new
    {
      Text,
      Format
    }.GetHashCode();
  }
}
The ReportItem is the abstract base class for all items that can be used in the editor. It has the common properties that are used to define the size and position of the item.
The TextItem is a concrete implementation for report items that contain a text. It has additional properties, but we can ignore them for now.
ViewModel
In the ViewModel, each concrete report item gets it’s own class. The ViewModel classes are merely wrappers around the model.
internal abstract class EditorItemViewModel<T> : ViewModelBase, IItemViewModel where T : ReportItem
{
  protected readonly T _item;

  protected EditorItemViewModel(T item)
  {
    _item = item;
  }

  public double Left
  {
    get => _item.Left;
    set
    {
      if (_item.Left != value)
      {
        _item.Left = value;
        OnPropertyChanged(nameof(Left));
      }
    }
  }

  public double Top
  {
    get => _item.Top;
    set
    {
      if (_item.Top != value)
      {
        _item.Top = value;
        OnPropertyChanged(nameof(Top));
      }
    }
  }
// etc.
}

internal class TextItemViewModel : EditorItemViewModel<TextItem>
{
  public TextItemViewModel(TextItem item) : base(item)
  { }

  public string Text
  {
    get => _item.Text;
    set
    {
      if (_item.Text != value)
      {
        _item.Text = value;
        OnPropertyChanged(nameof(Text));
      }
    }
  }
}

public interface IItemViewModel : INotifyPropertyChanged, IDisposable
{
  double Left { get; set; }
  double Top { get; set; }
  double Width { get; set; }
  double Height { get; set; }
}
There’s again a base class that is commonly used for all elements in the report editor. It implements the interfaces IItemViewModel, INotifyPropertyChanged, and IDisposable. The implementation of the last two is done in the ViewModelBase class. This should be pretty common and I will skip that part for now.
View
In the View, the container that will hold the UI elements is an ItemsControl, whose ItemsPanelTemplate is set to be a Canvas. This is because a Canvas has no ItemsSource DependencyProperty that can be bound to.
<ItemsControl ItemsSource="{Binding Items}">
  <ItemsControl.ItemsPanel>
    <ItemsPanelTemplate>
      <Canvas />
    </ItemsPanelTemplate>
  </ItemsControl.ItemsPanel>
</ItemsControl>
The ItemsSource is bound to an Items property in the main window. This contains an observable collection of IItemViewModel elements.
public ObservableCollection<IItemViewModel> Items { get; }
In the resources, a DataTemplate for each concrete ReportItemViewModel is defined:
<DataTemplate DataType="{x:Type vm:TextItemViewModel}">
  <Border Width="{Binding Width}"
          Height="{Binding Height}"
          BorderBrush="Gray"
          BorderThickness="1"
          Canvas.Left="{Binding Left}"
          Canvas.Top="{Binding Top}">
    <TextBlock Style="{StaticResource TextItemTextBlock}" Text="{Binding Text}" />
  </Border>
</DataTemplate>
The DataTemplates are defined in a way that WPF knows that they belong to a certain ViewModel class. TextItemViewModel in this example. The ItemsControl that is used in the main window will automatically know from the type of the ViewModel which DataTemplate to use.
First Try
After finishing the rest of the implementation, including some controls for editing the item properties, I could see my first text item in the canvas on the main window:

To my surprise, changing the size of the item worked like charm, but the location never changed. I am able to modify the Top and Left properties, the data in the model got updated and the corresponding PropertyChanged events got triggered. So what could be wrong?
It became more clear to me after looking at the visual tree using Snoop (https://github.com/snoopwpf/snoopwpf):
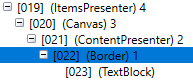
Inside of my Canvas, each element is wrapped in a ContentPresenter. This is automatically done by WPF.
The attached properties for changing the Top and Left position in the canvas are defined on the border, but not on the ContentPresenter.
What now?
To fix that, I decided to use a behavior, in order to comply with the MVVM pattern and to prevent using code-behind.
I created a behavior that will bind the necessary attached properties of the Border to the ones of the ContentPresenter.
Here’s one example:
internal class ResizeEditorItemBehavior : Behavior<FrameworkElement>
{
  protected override void OnAttached()
  {
    base.OnAttached();
    var parentContentPresenter = AssociatedObject.GetParent<ContentPresenter>();

   if (parentContentPresenter != null)
   {
     var bindingLeft = new Binding
     {
       Source = AssociatedObject,
       Path = new PropertyPath(Canvas.LeftProperty),
       Mode = BindingMode.OneWay
     };
     parentContentPresenter.SetBinding(Canvas.LeftProperty, bindingLeft);
  }

  protected override void OnDetaching()
  {
    var parentContentPresenter = AssociatedObject.GetParent<ContentPresenter>();
    if (parentContentPresenter != null)
    {
      BindingOperations.ClearBinding(parentContentPresenter, Canvas.LeftProperty);
    }
  }
}
This uses a VisualTreeHelper to find the parent ContentPresenter of our control in the visual tree. Then we attach a new Binding from the Canvas.Left attached property on the Border element to the Canvas.Left property of the ContentPresenter. The Border is the AssociatedObject here, because the Behavior will be defined on the Border in Xaml. The additional binding is added when the behavior is attached to the element.
Now I have to use the behavior:
<DataTemplate DataType="{x:Type vm:TextItemViewModel}">
  <Border Width="{Binding Width}"
          Height="{Binding Height}"
          BorderBrush="Gray"
          BorderThickness="1"
          Canvas.Left="{Binding Left}"
          Canvas.Top="{Binding Top}">
    <behaviors:Interaction.Behaviors>
      <viewBehaviors:ResizeEditorItemBehavior />
    </behaviors:Interaction.Behaviors>
    <TextBlock Style="{StaticResource TextItemTextBlock}" Text="{Binding Text}" />
  </Border>
</DataTemplate>
This requires adding the Nuget package Microsoft.Xaml.Behaviors and adding the namespace in the Xaml file:
xmlns:behaviors="http://schemas.microsoft.com/xaml/behaviors"
Here’s an archive of the source code and a working example: